(Nails)
Velvet Nails Are Actually Easier To DIY Than You’d Think — Here’s How It’s Done
Fuzzy and festive.

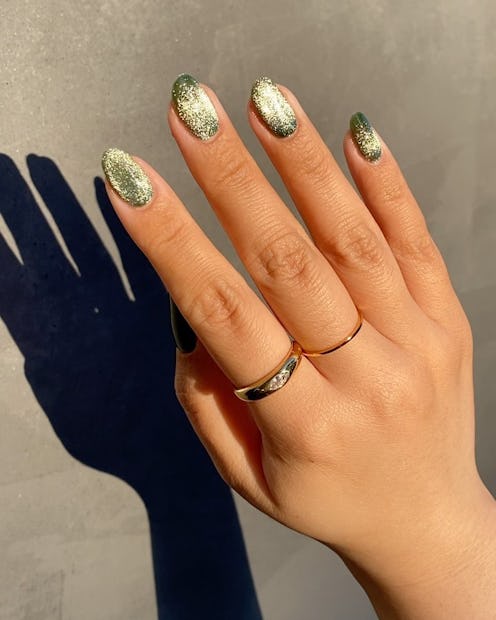
You’ve seen them up and down your assorted news feeds, adorning the fingers of celebrities, influencers, and seriously stylish civilians alike. Fuzzy, textured-looking “velvet nails” are everywhere right now, and their luxe look becomes all the more opulent this time of year. Part of the allure is that, because they are still so new on the scene, most people don’t know how to do velvet nails or even how they work — you’d be surprised how many people will mistake your new manicure for actual velvet placed just-so on the nail. It’s all part of the biggest nail art movement of the year, and it doesn’t require any tiny paintbrushes or anything close to a perfectly steady hand.
One could argue that 2022’s biggest nail trend isn’t any color, but rather unique finishes that can play off any shade. Chrome nails, cat-eye nails, and now velvet nails feel the same as any other classic manicure, but appear to be made of something else entirely. It’s an easy way to elevate even the simplest colors, letting the optically illusive effects be nail art in their own right. But despite the complicated appearance of velvet nails, they’re surprisingly simple to recreate at home, even without professional assistance. Here, TZR taps a top nail expert for a play-by-play breakdown of exactly how to do velvet nails.
Gather Your Materials
According to Juli Russell, DIY Nail Expert for Sally Beauty, velvet nails are a prime choice for the colder months. “Velvet is the texture of the holiday season,” she says. “It's so rich, luxurious, and classic — so it's no surprise the trend has surfaced to the nail world.” But before filing, painting, or gluing anything down, it’s crucial to make sure you have everything you need for velvet nails first. Russell says there are a few different ways to create the velvet effect: you can use a flocking powder or dip powder with no top coat, a matte top coat over a metallic polish, or a nail polish that creates the fuzzy effect when in contact with a magnet.
You’ll also need all the regular essentials you’d bust out for any manicure: polish remover, pushies, clippers, and files are not only all necessary to ensure the best possible application, but help prolong the life of your manicure (and the delicate nails beneath).
The magnet and powder will give you the most realistic look — powder “will not only look like velvet but it will feel like velvet too,” Russell adds — but the beauty of the velvet nail trend is there are so many different degrees and styles that it becomes totally personal.
The Powder Method
Regardless of which method you’re using, Russell says to start with basic nail prep across the board. That means cleaning up the beds with polish remover to remove any lingering debris and help the new polish adhere better, trimming and filing nails to your desires shape and length, and snipping away the cuticles if you so choose.
Let’s say you’re taking the powder route first. After covering the nail in a dip-friendly base coat, apply the powder to the wet nails and carefully shake off any excess. If you’re using a communal powder, like at the salon, make sure you or your manicurist decants the powder from the larger jar into a personal container for dipping (a shot glass works great) to ensure no bacterial cross-contamination. “Let it fully dry and you have a velvety-to-the-touch manicure,” Russell says, though she notes that because this look doesn’t call for a top coat, it won’t last as long as the others.
The Magnet Method
You might have seen magnetized nail polish trending earlier this year with the rise of “cat-eye” nails, which call for a magnet dragged down the center of the nail to create that slitted-iris effect. It works much the same way for velvet nails with just a few adjustments. After completing your basic nail prep, apply a thin, even coat of magnetic nail polish — which is so popular now, you can shop tons of shades and all-in-one kits at virtually every drugstore.
“Using the provided magnet, hold it on each side of your nail for about three seconds,” Russell instructs. “The closer you hold it to your nail, the stronger the effect. But be careful not to touch your wet polish!” Layer on a second coat and repeat the process, but don’t be afraid to change up the magnet’s angle for a less-uniform feel. Finish it off with a top coat and you’re (nearly) out the door.
Protect Your Manicure
Russell warns against seeing base coats and top coats (except for in the case of the dip-powder look) as anything other than optional. Not only does it protect your color from fading or chipping faster than you’d like, but it guards your real nails against polish stains and wear-and-tear. And what’s two more steps in a DIY process this refreshingly easy?