(Beauty)
How To Recreate This Fall-Ready Nail Art Design, According To A Celebrity Manicurist

If you aren't artistically inclined, then the fall 2019 nail art trends may feel as accessible as artwork by Picasso — gorgeous, yet seemingly impossible to recreate at home. Even on-trend minimalist nail designs can suddenly seem unexpectedly complicated when you decide to take them on using your own polish arsenal. However, where there's a will, there's a way; especially when you take the advice of the Essie Celebrity Manicurist, Michelle Saunders.
Read more: Negative Space Manicures For Spring Are So Trendy & Just As Easy To DIY
Using shades from Essie's new fall collections, Saunders created four exclusive nail art designs that are perfect for autumn and easy enough to DIY at home. (Yes, really.) The very first step is stocking up on the necessary colors, though; which you can do by clicking over to Essie's website or its Amazon page. Saunders used shades from Essie's sweater weather-inspired fall 2019 collection and its new Game Theory nail polish collection, which debuted via Lizzo's glam manicure on the 2019 MTV Video Music Awards red carpet.
And while you may not be stepping onto a red carpet this month, these four fall-ready looks will have you feeling a little more luxe this season. Below, Saunders' four autumn-inspired nail art ideas, plus all the shades you need to complete each look.
1. Multi Moon
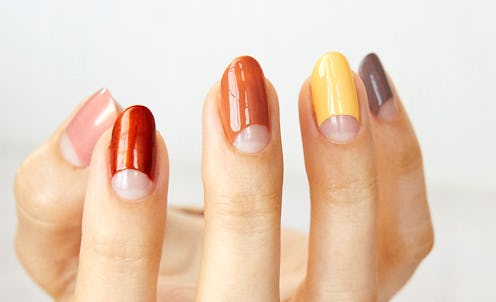
Saunders used five shades to complete this on-trend muted rainbow look: Home Grown, Rust Worthy, On The Bright Cider, Hay There, and Easily Suede. "Start with clean nails. To create negative space use an oval clean-up brush dipped in polish remover to carve out moon shapes with each nail color," manicurist Michelle Saunders tells The Zoe Report over email. "A pro tip is to add Here To Stay Base Coat over entire nail after nail color then finish with Speed Setter Top Coat."
2. Leaves
Naturally, fallen leaves may instantly come to your mind when you think of autumnal nail art — but there's a technique to nailing the design (no pun intended). "Begin with one nail at a time," Saunders says. "Paint one thick coat of On The Bright Cider. Use a small clean-up brush dipped in polish remover to carve out leaf shapes. Do this to all 10 nails. Next apply alternative colors into the negative space with a striping brush."
3. Autumnal Print
Surprisingly, only a handful of steps go into this complex-looking design. "Apply two coats of Hay There to all 10 nails," explains Saunders. "Next, using a striping brush dipped in Rust Worthy, paint floral pattern onto each nail. Finish the look with Speed Setter Top Coat."
4. Ticking
Since negative space is such a key part of this design, Saunders advises to start with a clean, dry slate. "With a striping brush paint Wild Card on left side of nail and Hold’em Tight on the right side creating two striped lines," the manicurist explains. "Angle sideways a small clean-up brush dipped in polish remover to remove small portions of nail color to create ticking lines."
This article was originally published on